Pages

蛋糕记录 情感生活 C'est la vie !

Sunday, April 27, 2014

汤种原味甜面包 & 辣豆芽沙拉 C.D. Plain Sweet Bun & Spicy Bean Sprout Salad

秉持着小强精神,我又来挑战手揉面包了。
这很不简单,表示我又要搓搓揉揉整小时了。

这次选择的食谱是来自FB Grace Yap的烫种原味甜面包 , Grace表明这食谱是无蛋奶的,也适合素食及全素者。
我希望是有馅料的,就用了芝士和牛油。
对我而言,这是一个需要少数材料且失败了也不怕浪费啦~

因为有些食谱的面包是面团成型后再加入油脂类,所谓的《后油法》。
当时我并不很了解先后加入油脂类的分别,也感谢Grace的用心教导。

《先油法》的好处是对新手较简单的制作方式,让油脂更均匀地融入面团。
《后油法》则是利用油脂能阻断面筋的形成,所以当搓揉面团至一定程度再加入油脂类将让揉面更简单。

我早些时候准备烫面,冷却后就和面粉类一切搓揉下去。


所有材料混合

揉了5分钟的状态


继续甩打,最多30分钟就需停止了。

这是我最好的成果了= =

发酵之前

发酵60分钟后,就可以分小团子再包入馅料


皮开馅露的,就变油煎包

整体来说,面包搭配馅料是味道不错的,口感稍嫌硬及干口。


汤种材料:高筋面粉 10g、冷水 50g

汤种做法:将高筋面粉和冷水放入锅内,用小火煮至浓稠且能画出纹路,熄火待凉备用。


面包材料:
汤种 50g
高筋面粉 300g
速发干酵母粉 1/2 teaspoon
糖 35g
植物油 25g
清水 160g

面包做法:
1. 将以上材料混合,揉成一个光滑且能拉出薄膜的面团,静待发酵60分钟。
2. 发酵完毕后取出面团,分成八份,然后滚圆,休面5分钟。
3. 休面后可以将面团整出自己喜欢的形状。
4. 将已整形好的面团整齐摆在烤盘上,静待发酵60分钟。
6. 预热烤箱。200度烤15-18分钟。


检讨篇:
原因应该是出至混合当时加入不足够水量。甩打面团的时候更本甩不出去。
就再加入水搓揉才稍稍柔软了点。
由于面团不够柔软,甩打的过程并不理想。

============================分割线=======================================

我家最爱的自制韩国餐啦~

匆匆买了豆芽,就开始了午餐的制作咯!

来自BeyondKimchee 的 辣豆芽沙拉,一看到就bookmark了呢!
让豆芽脆卜卜的就是神奇的烹煮六分钟,记得别偷看哦!

煮过的豆芽也可以很脆口哦!

豆芽


辣椒粉
青葱
葱末
酱油
麻油
辣椒末
(我另加入蒜末和洋葱末,风味比较好嘛~)

1. 小锅内加入豆芽盐,及稍微盖过豆芽的水量就可以了。盖上锅盖以中火焖煮6分钟(3分钟后就可转小火了)。取出豆芽而已。

2. 碗内加入青葱,酱油,麻油,辣椒粉,蒜末,洋葱末,辣椒末,葱末,即可!!


另外,
也准备了清炒素菜


Saturday, April 26, 2014

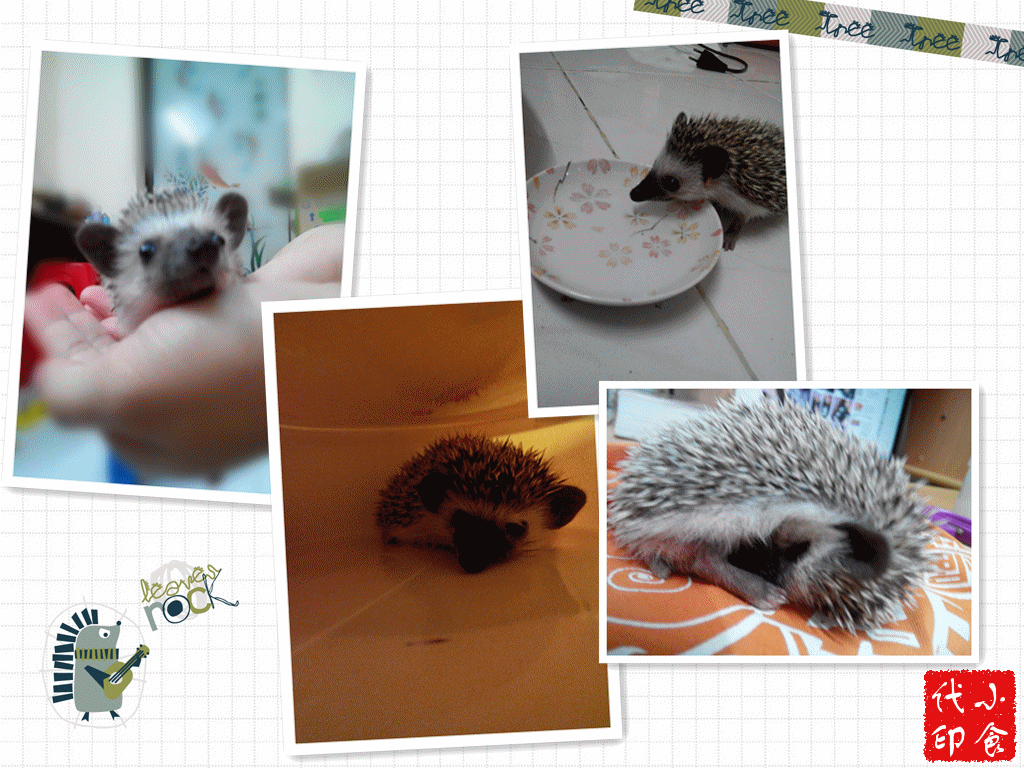
A New Member in Our Family,Little Piggy

This is a pending post, though.
I knew my blog had filled with emptiness since last post on Feb, laziness occupied me!

Hedgehog is here! Not a porcupine!!

It is a he, cute and spiny friend!
I named it Little Piggy because it ate and sleep like piglet~~

Naming came to be the most difficult part and I just got the name a few days ago.
Little Piggy was born in 15 Feb 2014, was now 1 month 10 days old.
Hedgie consume high protein cat food, vegetable and fruit can also be included in the daily diet.
Needed daily workout like ordinary pet dog did too!

I didn’t use the shred bedding since I read through a few article strongly recommended not to used bedding and it will eventually bring side effect to their respiratory system and mite problem.
I had prepared a flannel fabric as blanket for Little Piggy

To be honest, I actually poked by its spine a few times and it did shed blood (just like you got poke by a needle), but not a big deal at all.

Here’s the pictures!
I’m may be spiky but I am so an adorable pet!!


Thursday, February 13, 2014

『戚风Chiffon』烫面--大爱班兰戚风 Pandan Chiffon

Finally, I got the fine opportunity to prepare a Pandan Chiffon with COOKED DOUGH METHOD by photos

Now, as for myself, I think that I had quite mastered the skills in baking chiffon cake
I did baked most of the chiffon cake successfully after I found out the skills worked the best on me  

After I was experiencing many failed attempts in baking chiffon (you can see as you read the chiffon cake’s post) because I always deflated the meringue
It make me frustrated but I still kept on trying, until…….

I am going to reveal the secret N.O.W!!

Instead of using the spatula to fold the yolk batter into meringue, I am using the hand-whisk. It really had made the folding easier and less deflating the meringue

Gladly, I bake nice chiffon afterward, even it is not perfect yet

So, if some of you still having the problem folding the batter with spatula, why don’t try to change it to the hand-whisk, it sure makes work easier……


Pandan Chiffon (Cooked Dough)
Recipe Via Forbidden Garden 特蕾莎(仙子)

(Egg Yolk Batter):
A

70 g    Coconut Milk             ------------Milk
50 g    Butter                     --------45ml Corn Oil
40 g  Concentrated Pandan Liquid   

B
90 g   Low Protein Flour    --------DIY Cake Flour

C
5        Yolks   


(Egg White Meringue):
5        Egg Whites
1/4 t    Cream Tartar        -------5 ml Vinegar
80 g   Fine Castor Sugar -------70 g 


1- Preheat oven to 170 C

2- Combine (A) in a small sauce pot and boil over low heat
Remove from heat once it simmer. Stir in (B)
Pour (C) in Step 1 and gentle mix till combined. Set aside but kept it warm

3- Whisk  at low speed until foamy, add in cream tartar/ vinegar at medium speed
Add in sugar in 3 additions and whisk until soft peak (I beaten the meringue till stiff peak formed)

5- Fold in 1/3 of the meringue into the egg yolk batter until combined. (By now, the egg yolk batter should be lukewarm). Then add into the remaining white meringue  and gently fold till well-combined

6- Pour into tube pan, smooth the surface and bang lightly to let the air bubbles out. Bake at 170 C for 10 minutes, then 150 C for another 35 minutes (I simply bake at 170 C covered the tube top with **aluminium foil and quickly remove it until 10 minutes before finish baking as to cook & browning the cake surface with fan force)


7- Invert cake pan and leave it cool
A bit of top side shrinkage occurs

Using the wrong plate (too curve), the cake get compressed


Slice & Enjoy!!


PS
** Due to the high heat of my oven, i used to cover the cake top with a sheet of  aluminium foil to prevent the cake from browning to much, remove it until the last 10 minutes for the cake to take on nice brown color with fan force


Tuesday, February 11, 2014

黄瓜泡菜 Oi-Sobagi

超级美味的一发!

食谱来自Maangchi家的Kimchi

其实看见了被关注的Kimchi House黄瓜泡菜,间接逛到Maangchi那儿去了
有着更加仔细的讲解和视频,就陷进去了

家里都是泡菜迷来的
芝麻要事先炒香,炒至像爆米花“啵”啵“啵”起来就好了

用的是这牌子的辣椒粉,小心不要一次倒太多


这儿有蒜末韭菜段胡萝卜丝大葱片
还有另外添加的姜末,增加口味儿嘛
少许的,适量的辣椒粉
全混在一起,就是腌料了

整颗的小黄瓜就这么划个“十”
黄瓜得事前用盐来腌制10分钟,再翻面腌另个10分钟
腌制完成后过过水,洗去多余的盐分

就是这个样子
把腌料塞进中间部分,就可以了

入味些更美味哦!
所以....

摆在玻璃罐内

后来觉得整颗黄瓜会比较不入味
就刀起刀落,切小块

就着腌料像拌Rojak那样拌均,就好

腌制的泡菜黄瓜
小块小块的可以直接吃,很清凉爽口,辛香料的味道很棒
一整颗的黄瓜的话,得再腌久一点,就应该够入味了

个人喜欢小块的泡菜黄瓜哦!!

烫面榴莲戚风 Cooked Dough Durian Chiffon

那天,爸爸的友人把猫山榴莲都给了我们
因为知道我和二妹还在家当米虫
就多给2粒,Uncle都没留给自己
全部4粒猫山都在我们手上
呵呵*笑得很贼*

3粒榴莲真的很浓郁,果肉很Creamy
其中1粒,沽出汗了,不好吃
但也不打算浪费,就留起来作戚风

家里7个人,其中2位不是榴莲 Lover
把一些榴莲留给爸妈,可他们都叫我们自己吃掉


今天
本是打算作7”小戚风
榴莲肉称了居然有143克
啊,快手快脚上网找食谱
把已经准备好的小戚风材料换成 8寸或21 cm戚风的量

材料我做了更改
榴莲肉我跟着Crystal 厨房找快乐放足122g,不要浪费了
油量我减少一些,健康嘛
戚风做法改为烫面手法

还在倒挂的戚风差点被蚂蚁攻击了,差点*挥汗*
冷却后的戚风有点缩腰的样子,我采用空手脱模
一压就有点点塌,中管和底部就直接用刀刮了


2 days ago, a good friend of Dad gave us Mao Shan Durians
Knowing that my Sis and l not went back to college yet*smirk*,
He gave another 2 and left with empty-handed
He is such a nice uncle

Mao Shan is really rich in flavor and the flesh was so creamy
Unfortunately, one of the 4 Mao Shan was “sweating” and tasted so plain
Without wasting it, l going to make a Durian Chiffon

Today
Actually, a small-sized chiffon is going to be made
After weigh the durian flesh, l got 143g
Ah! Quickly search on internet for a large chiffon recipe
Re-measure all the ingredients

I had made some small changes on the following recipe
Increase the amount of durian puree and reduce the oil
Follow Cooked dough Chiffon method then…


有缩腰的迹象
Side of the chiffon reduce from pan line


伸懒腰, 柔软
Soft enough it can stretch


Recipe Via 厨房找快乐

(Egg Yolk Batter):
A

90 g    Milk
50 g    Corn Oil                 --------45ml
2 g      Salt 
100 g  Durian puree          --------122g

B
85 g    Self-Rising Flour    --------DIY Cake Flour

C
5        Yolks   

**15 g    Fine Castor Sugar  -------Plus into meringue 

(Egg White Meringue):
5        Egg Whites
1/4 t    Cream Tartar        -------5 ml Vinegar
50 g   Fine Castor Sugar -------60 g 


1- Preheat oven to 170 C

2- Combine (A) in a small sauce pot and boil over low heat. Remove from heat once it simmer. Stir in (B)

3- Pour (C) in Step 1 and gentle mix till combined. Set aside

4- Whisk egg white at low speed until foamy, add in cream tartar/ vinegar/ lemon juice at            medium speed. Add in sugar in 3 additions and whisk until stiff peak formed

5- Fold in 1/3 of the meringue into the egg yolk batter until combined. (By now, the egg yolk batter should be lukewarm). Then add into the remaining white meringue  and gently fold till well-combined

6- Pour into tube pan, smooth the surface and bang lightly to let the air bubbles out. Bake at 170 C for 35-40 minutes till cooked

7- Invert cake pan and leave it cool


PS

戚风很柔软湿润,榴莲风味不错
下次可以减少液体的量哦
This chiffon is so soft and moist, good flavor
Maybe next time, amount of liquid should be reduce a little bit  


Slice & Enjoy!!


Monday, February 10, 2014

那些天,孤独的恶梦

看回部落格里面的Draft,发现了这一篇,
存档很久很久的
勾起了很多的回忆
这是一件很久很久的事情了
是我刚刚入学Diploma,在Bintulu, Sarawak
那一年是2009
数起来,已经有5个年头了


还记得那一天,学姐叫我离开讲座会。
我很纳闷,后来跟上了她的脚步,上了救护车。
一定觉得很奇怪吧?怎么会是救护车
那是我作为大学新生的第几天了,我大约记得是7月头吧
那是minggu perkasa


后来,我被吩咐收拾些许日常用品
马上
从blok G 到 blok H
手上的东西,心头上的沉重,顿时成了鲜明的对比
我,大概知道我需要面对什么了

H1N1.l'm being suspected

因为,我临时的室友发烧了
到了的时候,我看到医生护士,带着口罩手套
看得我心里顿时慌了起来
可是我想,我一定看起来会很轻松,也很倔强。呵呵
我好恨被人看见自己懦弱的模样

那天晚上,我一个人
我想说,也好通知我父母
但是,却令他们好紧张,很是担心
通话时,我压抑着,不把哭腔呈现出来
通话结束后,我哭得好压抑
也努力说服自己,这没什么大不了的

crying is not gonna help

我还蛮努力的
之后3天,我一直担心这自己的体温,不想让它成为我的恐惧
那样的情况,还真是第一次体会啊
体温也会让人害怕呵
那3天的日子,想起来也是一种体会
因为,好怕靠近我,却不得已给我送饭的学姐
我确实体会了那种心情,被怀疑,被隔离的感受
说真的,写实但也很现实
终于,这样一切倒也结束了
我真的,很心安

那些天的体会,雕刻了属于自己的另类收藏


以上内容,我没更改多少,都是原汁原味的当下感触
有了很多的第一次
第一次,乘上救护车,其实不算是好事
第一次,被怀疑感染,更本就是半坏半好的事
第一次,庆幸自己那份自我感觉良好的幸运感
第一次,感觉生命是那么脆弱,要好好把握
也是第一次,发觉什么都比不上家人,特别期望当时他们就在身旁

17H手揉面包

第二次手揉面包,是纯天然班兰口味

因为手头上所抄写的食谱本子太多,本人也不善整理
So
我又忘了是谁家的,但有到ccm家& Carol老师,她们真是面包高手
这之前,由于没有事前testing 开封的干酵母
就间接造成了手作直接法黑芝麻面包,以失败告终
秉持着不浪费且黑芝麻是很营养的,就继续烘干
变成我家Happy狗狗的狗食,给Happy咬咬咬

后来翻看了谁谁家部落格,好像是在东东家发现了17小时中种面包
不同的是,多数是采用面包机制作,我靠双手
果然,有了臂力和耐心,手揉面包才构成第一条件
接着就是我缺少的,技术了*唉*


这是第一次的17度酵母种,冰箱太冷了又拿出来发酵的成果
高筋面粉+酵母+水blah blah来的


第一轮发酵的面团至2倍大
真的有老皮的感觉
一旁橙色盖子装的是热水,促进发酵进度

噢,差点忘了
要确保已完成发酵的话,就要.....
手指沾面粉
我戳
不回缩的话,就恭喜了

再来,分成小圆球,再发酵
变成

锅子太小了,不好意思啊


接着,杆开再卷起里
又是太挤了

烤出来,发现里面还没熟,再回去烤过
造成出来的面包边缘干干燥燥的
第二天要蒸过才好吃,冷了后就是那样了
呜呜....

但是班兰的味道有浓郁到,像是Pandan Kaya的味儿呢*拍手*
成品又是没记性,没照成
The End了

Design by | SweetElectric